HomeAbout MeMy ShopGallery

Wednesday, May 26, 2010

LOVELY TATTED HEARTS, MY SWEETIE, BE ENGLISH ROSES, PAINT CHIPS

Hello Everyone,

A short time ago I received a very lovely message from a kind and wonderful friend saying she would like to make me a tatted heart in celebration of my 60th birthday. Her message truly made me smile and it certainly warmed my heart.  How very kind of Wendy to make such a lovely gesture. She asked me what color I would like it to be.  She sent me off to a couple of tatting sites to look at shades of colors.  I decided on the color called "Wheeping Cherry" hand dyed by Sherry AKA Lady Shuttle Maker. Sherry great blog is called, "Tatting Tales" so please go and have a look. 

Today I received in the post a letter from Wendy in SinaporeWendy's blog is called, Umi & Tsuru. You must have a look at all the turly lovely tatted creations Wendy makes.  I was very excited to open the letter to see My tatted "Queen Of Hearts"!Have a look below, Isn't the color glorious and the heart is so danity and perfectly made.  Thank you Wendy, I love it. 


I opened the lovely card to see what Wendy had wrote to me and to my great surprise Wendy had tatted two more equally beautiful tatted Queen of Hearts. Of course they were in shades of Pinks my favorite colors.  I was overwhelmed and humbled that Wendy would create for me these beautiful tatted hearts. Thank you Wendy form the bottom of My Heart for your very lovely gifts. Please look below at the next two photos.


Above you will find a photo of another wood creation "My Sweetie" made for me to put in my garden. Yup a "Soaring Trellis" for my lovely Purple Clematis which is just about ready to bloom. My Sweetie goes out everyday to guide there vines to the top. I took this pic about a week ago and the vines have already climbed to the second cross bar from the top.  I will take another pic when it is in full bloom.

Today I finished the third BE flower Motif for my shirt.  It is called a Brazilian Embroidery English Rose. It is my first attempt at creating this rose. I used pastel shades of pink to almost white. My shirt is starting to look "Fancy"!

Here is a photo of the three flower motif I have created on my shirt so far. I still need to add the leave to the Aster and maybe a couple of buds too.  What do you all think?  Should I add more smallish flowers inbetween the other flowers?? Or should I just leave as is.  I would greatly appreciate you all opinion.  Thanks

I have decided on paint colors for in My Creative Room. It was not an easy task.  I knew I wanted to create a peaceful quiet atmosphere to create in. I have two windows that lets in lots of light in during the day. I was torned between "Onion Powder" and the "Sourdough".  I ended up with "Sourdough". Both my sweetie and the paint guy reckon that the "Onion Powder" color with all the light would look like NO color at all.  I picked out "Sugar Soap" for the trim around the windows and base boards and it will also be the color for the new book shelves My Sweetie is going to make for me. What do you all think????????  

And last but not least is a photo of My Reblooming Josee Lilac.  It will only get about 4 to 5 foot tall and about the same widith.  It is blooming right outside my front door and the smell is heavenly. It will rebloom again in September.  I love it.

My Sweetie and I am going to start on a "New Journey" in our lives. My Sweetie retires on May 28th 2010. He has worked 49 years full time as a "Master Electrician" and has never been without a job. I admire him so much. My Sweetie is the most Kind, Generous and Loving man I have ever know. I am very "Thankful" everyday we are together.

So I have been now blogging for just about 4 years. I have truly enjoyed sharing my "My Art", "My Gardens" and "My Family" with you all.  I have met so many wonderful and kind blogging friends during this time that I truly treasure.  You all have enhanced my life in so many special ways. I have decided to take a "Blogging Break" this Summer and enjoy this "New Journey" which My Sweetie and I are about to Begin. I hope to visit with you all during this time but I will not be posting anything on my blog. 

I will return in "September" and at this time I will have a "4 Year Blogging Celebration" with a "Give Away of My Art". I am not sure what it will be yet. I hope all My Blogging friend will come back and visit me again in September.  I wish you all a Wonderful, Happy and Fun Summer/Winter!!
Hugs

Saturday, May 15, 2010

RENOVATIONS: THE BEGINNING and MY LOVELY GRAND CHILDREN

HELLO EVERYONE,

Last week I took out a small book shelve and transferred it to the sunroom.  Half of the books went to the sunroom and the other half to the basement.  Just this small beginning took me "All" day and I was truly tired by the end of it. So Today I took three quick photos of my very very messy "Creative Room"!! Very Sad Face. I am a bit ashamed of how I have let it go in the pass year.  It has not always looked like this. You are seeing it at its very worst.  I thought I would document the "Mess" so  when the finally "New Creative Room" is done I would truly appreciated it more. 

In the above photo you can see I have bought some smallish storage containers for my threads and my many embroidery flosses and one day they will all be nicely place on new shelving.  The antique 9 comparment storage cabinet, I bought while I was living in Germany.  I am not sure if it will stay or go somewhere else. 

Today I totally removed everything from the Oak cabinet.  This also took more "Time" than I imagine it would.  This cabinet is now in the garage and will be sold.  So now I only have the white shelve to unpack and remove.  My Sweetie is going to build me a "New cabinet and Book Shelves for this whole wall. Isn't he a real Sweetie"?

This was the closet for the smallest bedroom.  I had My Sweetie take off the doors and had this shelving put in 5 years ago.   At first I just had my fabric and stuff laying on the shelving.  My fabrics got totally disorganized very quickly.  Then I decided to go for the bins you see now.  Unfortunately, when these bins are packed to the brim with stuff, it is very difficult to find what I am looking for. 

Sooooooooo the "Question" I would like to ask "My Blogging Friends" is  does anyone have any "Suggestions" on how I can best utilize this space for my fabric stash and other stuff.  I think I would like to get rid of all the bins and try somehow to organize the fabric and things back on the shelving again.  Or Maybe I should just remove the shelving and build wood shelving with sections in them??? Oh, Dear what a mess I have!!! Help Please!!

I was out shopping on Friday evening and I found this very lovely "Rose" storage box on sale and I could not resist buying it.   I was thinking of storing my stash of greeting cards in it.


I have been also doing a bit of stitching in the last few weeks.  I have bought this blue shirt and I decided I wanted to embroidery on the "Yoke"
with all  Brazilian Threads.  This is my first motif I have completed.  It is called the "Wild Rose".  I am pleased with it.  What do you all think?

Last weekend was My Sweet Grandson Birthday.  The above photo is of the double fleeced tied blanket I made him. It has his favorite cars on it.  We had such a great day visiting with My family.

My Sweet Grand Daughter's birthday is very soon so because we live a very long distance from her I gave Chloe her Pressies too.  I made her a "Princess Fleece Blanket and you can tell she really loved it.

I would like to Thanks All My Blogging Friends who visit and those too who leave me lovely comments to read. 

The last several days have been so sunny and nice that I even got outside and did some gardening.  I can see I have a very busy summer ahead of me with all my gardening and the "Renovation Project". 

Take Care All,

Hugs


Monday, May 3, 2010

TUTORIAL ON CREATING A NEELDE LACE PILLOW

Greetings to Everyone, 

I am venturing out a bit to learn the art of Needle Lace.  In my last post I showed you a wee green leaf which was very difficult to create in an embroidery hoop.  So hence, I asked two fellow needle lace makers how they created their Needle Lace Pillows and they referred me to their blogs.  Lenore who is from SW Michigan was very helpful and her blog is called,  tatt3r'slacystuff. Click on Lenore's blog to see how she created her Needle Lace Pillow.  Also Britt from Perth Western Australia also shows her Needle Lace Pillows on her blog called "Stitchety Grub".  Both sites were very inspirational.   

So I started off searching for a container to use.  I found a Bungee Cord container like Lenore had in our basement so I used it too.  I wrapped it with blue foam I found in the sports department at Meijer's. It is approximately 1/4 inch thick. I applied the foam to the bottle with E-6000 Glue and then tied a string around it and let it set for 24 hours.

In the above photo it shows the fabrics I decided to use for this project.  I have endless supplies of fabrics so I decided on some batiks fabrics I bought years ago.  It was time to use them.  I also Crazy Quilt Pieced a CD Pincushion top and started stitching on it while the glued was drying on my container.  The tutorial for the CD Pincushion is on Lisa's blog called,
 "Ivory Blush Rose".  Lisa's blog is very lovely and she is a very talented and creative stitcher.

I then wrapped the plastic container with two layers of "Warm and Natural Batting"  and hand stitched the seams together.  My Needle Lace Pillow is approximately 9 inches long and 18 inches around with the batting on it.

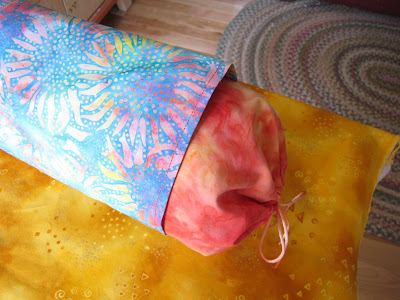
Then I added my Orange Batik fabric and made it approximately 18 inches long so I had plenty of lenght to fold over both ends and make a casing.  On one end I pulled it tight and tie it off.  This is the end I plan to add the CD Pincushion too.  The other end I left a bit of room too.  The cap of the container can still be unscrewed to put my needle lace supplies into for storage.

Then I added my second layer to fabric all away around. It is very loosely added so I can place a wooden dowel under this area.

In the above photo you will see my completed CD Pincushion and I am now ready to stitch it to the closed end of my Needle Lace Pillow.

Here is a photo of my CD Seascape Pincushion fully attached to My Needle Lace Pillow.

To make the wood Needle Lace Dowel, I had to recruit "My Sweetie" whose has a passion for woodworking. Lucky Moi!!!  But first, I went to Menards and bought a Wooden Dowel that was 1 1/4 inch thick. It was the largest they had available.  Then My Sweetie took it to his wood shop and started creating my Needle Lace Dowel. The total lenght of the dowel is  9 1/4 inches long.  He cut the fancy end on it to make it easier for me to pull on it. Then he spray painted it with a primer, the aqua paint was next and he put a sealer over it. It is now nice and smooth so it will not catch on my fabric.

So this is a photo of My Completed Needle Lace Pillow with CD Seascape Pincushion.  You can see in the background My Sweet Grand Daughter Chloe.  She will soon be 4 years old.

Because stitching is my first passion I thought I would show you all the Seascape Stitching I put on the top of My CD Pincushion. I never really have a plan when I start.  I just pull lots of flosses and beads and start stitching away.  I have recently in the last year learned how to do the "Drizzle Stitch" and "Open and Close Woven Picot Stitches" so I like using them often.  vbg 

 Some of the flosses I used was "Kreninik Metallics Medium #16 Braid", "Mouline DMC Variations" in the aqua and oranges, "DMC Cotton Perle" in variegated colors, "Valdani Pearl Cotton", "Necessities, Over Dyed Floss" "River Silks" hand dyed Silk Ribbon and "Flair" tubular Ribbon and "Frosty Rays" which I scrunched up to look like seaweed.

The colors and fabric I choose for the project is not in my comfort zone.  I rarely use these colors.  I truly enjoy the stitching and at time I find myself having a difficult time stopping.  You can see I did leave a wee bit of space for the pins.     

This is a photo of my completed CD Seascape Pincushion.

The above photo is of two vintage Needle Lace books I bought recently.  I am very anxious to start learning the art of Needle Lace. 

My Friend Ann an Expert Needle Lace Maker from England advised me she uses "Pearsall's Embroidery Silk" which is made in England. The above photo is my recent purchase of this silk floss.  I can hardly wait to use it. 

I am going to the Mid Michigan Lace Maker's Guild Meeting this coming Saturday and I am taking their class called "Pin Lace".  I am looking forward to it.  In My Next Posting I will share with you all photos of this meeting and what kind of Lace I create.

During the mean time I would like to thank all my blogging friends for visiting My Blog and leaving lovely comments for me to read.  They are all greatly appreciated. 

Our weather has been so glorious that My Flower Gardens our sprouting and blooming everywhere.  "Spring" is my Most Favorite time of year. 

When I was at my favorite book store I found the "April Issue of British Country Living". Oh, how I love this Magazine.  This issue was special because it was the "Garden Issue.  I instantely bought it and when I got home I went to the sunroom cuddle up in my easy chair and immerised myself in all the truly beautiful photos of gardens around the world.  .  Looking at all these gardens photos made me smile and made my heart feel very happy.   

Take care My Friends and I will chat again soon. 

Hugs                                                                                                                
 
Related Posts Plugin for WordPress, Blogger...